Cross-linking ChIP-Seq (X-ChIP-Seq) protocol
Licia Miller Product Manager
Detailed procedure and tips for cross-linking ChIP using ChIP-seq and ChIP-qPCR methods.
Chromatin immunoprecipitation and sequencing (ChIP-Seq) is a technique that allows us to analyze DNA-protein interactions at a genome-wide level.
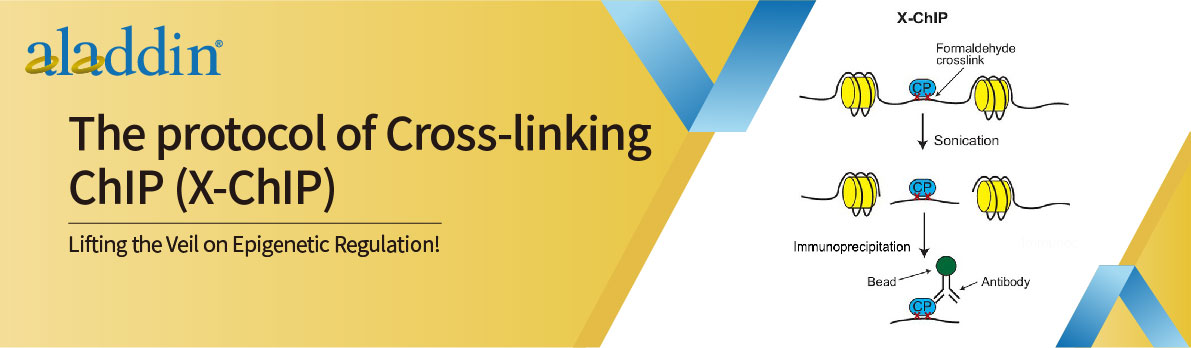
In this technique, we first cross-link chromatin complexes, isolate them from the cell nuclei and fragment them. We can then purify chromatin fragments containing our protein of interest by immunoprecipitation. After this, the DNA fragments are purified and sequenced. We can use the sequencing results to determine the DNA regions our protein of interest interacts with.
Here we provide a detailed protocol and tips for performing cross-linking ChIP-seq method. At the end of this protocol, we will have prepared purified DNA ready for library preparation sequencing.
Our protocol is optimized for HeLa cells using chromatin from 1x10⁷ cells per ChIP sample. The protocol also highlights the differences in the ChIP-seq procedure for various protein types, such as histones and transcription factors.
Stage 1 Bead preparation
Before isolating the chromatin from your cell samples, we should prepare the ChIP-grade antibodies and beads so they’re ready for immunoprecipitation.
Materials required
- ChIP-grade primary antibody
- Protein G magnetic beads
- Ice-cold PBS (example T494526)
- RIPA-150 (50 mM Tris-HCl pH=8.0, 150 mM NaCl, 1 mM EDTA, 0.1% SDS, 1% Triton X-100, 0.1% sodium deoxycholate)
- Blocking buffer (0.5% w/v BSA, 1x Protease inhibitor made up in RIPA-150 buffer)
Steps
7 hours approx
1、Prepare a slurry of protein A/G beads.
Add 12.5 µL of protein A beads and 12.5 µL of protein G beads for each sample you wish to run to a tube to prepare a 50:50 mix.
Warning: Keep beads at 4°C.
Notice: Beads can be vortexed briefly to help resuspend them before preparing the slurry.
Beads for multiple experiments can be prepared together in a pool.
2、Wash the beads twice with an excess of ice-cold PBS.
2.1 Place the tube on a magnetic rack for ~1 min; the beads should be pulled by the magnet to the bottom of the tube.
2.2 Aspirate and discard the solution, keeping the beads in the tube.
2.3 Add an excess of fresh, ice-cold PBS to wash the beads.
2.4 Collect the beads using the magnet and aspirate and discard the solution.
2.5 Repeat the PBS wash step once more so that the beads have been washed twice in total.
3、Block the beads with blocking buffer.
3.1 Remove the PBS solution from the last step.
3.2 Add 1 mL of blocking buffer.
3.3 Incubate beads in blocking buffer for 30 mins at 4°C with gentle rotation.
4、Wash the beads twice with 1 mL of RIPA-150.
4.1 Place the tube on a magnetic rack for ~1 min; the beads should be pulled by the magnet to the bottom of the tube.
4.2 Aspirate and discard the solution, keeping the beads in the tube.
4.3 Add ~ 1 mL of fresh RIPA-150 and repeat the steps above.
4.4 Repeat the RIPA-150 wash step once more so that the beads have been washed twice in total.
5、Bind the beads to ChIP-grade antibodies.
5.1 Resuspend the beads in RIPA-150 buffer so that each experiment has 25 µL of bead slurry in 500 µL of RIPA-150 in a separate tube.
5.2 Add your antibody to the resuspended bead mix. We use 4 µg for histone targets and 8 µg for non-histone targets.
5.3 Incubate for ~6 hrs or overnight at 4°C with gentle rotation.
Notice: If you pooled beads together previously, you could split them into individual samples at this step.
Refer to the manufacturer’s advice for the exact antibody concentration.
Stage 2 Harvesting and cross-linking cells
We use formaldehyde for cross-linking cells to preserve DNA-protein interactions. The cross-links will be removed later when ready for sequencing.
l Adherent cells
Materials required
- Cells in culture
- Ice-cold PBS (example T494526)
- Cross-linking agent (formaldehyde, example F111939)
- Quencher (glycine)
- Cell scraper
Steps
20 minutes approx
1、Wash cells and suspend in ~ 25 mL of ice-cold PBS.
1.1 Remove cells from the incubator at ~90% confluence.
1.2 Gently rinse cells twice with 10-20 mL of ice-cold PBS.
1.3 Discard the liquid and pipette in ~27 mL of ice-cold PBS.
Notice: We use 1x10⁷ cells per sample. Ensure you grow enough cells for your experiment.
2、Cross-link cells in 1% formaldehyde.
2.1 Gently add formaldehyde to the flask to a final concentration of 1%.
2.2 Incubate cells for 10 mins at room temperature with gentle swirling.
Warning: Perform this step in a fume hood.
3、Quench the cross-linking with glycine.
3.1 Gently add glycine to the flask to a final concentration of 125 mM.
3.2 Incubate cells for 5 min at room temperature with gentle agitation.
Warning: Perform this step in a fume hood.
4、Wash cells twice in PBS.
4.1 Discard the liquid in the flask.
4.2 Gently rinse cells with 10 mL of PBS.
4.3 Discard liquid after each wash, adding fresh PBS after each wash.
Notice: When discarding the waste containing formaldehyde, please follow your local regulations for its disposal.
5、Detach adherent cells and place them in a fresh tube.
5.1 Discard the liquid in the flask and place the flask on ice.
5.2 Add ~ 5 mL of PBS.
5.3 Scrape cells thoroughly to detach them from the bottom of the flask.
5.4 Pour the suspended cells into a fresh tube.
5.5 Repeat as necessary.
l For suspension cells
Materials required
- Cells in culture
- Ice-cold PBS (example T494526)
- Cross-linking agent (4% formaldehyde, example F111939)
- Quencher (glycine)
Steps
25 minutes approx
1、Take cells from the culture, wash, and suspend in ~ 25 mL of ice-cold PBS.
1.1 Remove cells at 90% confluence.
1.2 Spin down cells to a pellet (1500 g, 4°C, 5 min) and discard the supernatant.
1.3 Resuspend the pellet in 50 mL of ice-cold PBS and spin it down as before, discarding the supernatant.
1.4 Resuspend the pellet in 25 mL of ice-cold PBS.
Tips: You can prepare multiple experiments together in a pool.
2、Cross-link cells in 1% formaldehyde.
2.1 Gently add formaldehyde to the flask to a final concentration of 1%.
2.2 Incubate cells for 10 min at room temperature with gentle swirling.
Warning: Perform this step in a fume hood.
3、Quench the cross-linking with glycine.
3.1 Gently add glycine to the flask to a final concentration of 125 mM.
3.2 Incubate cells for 5 min at room temperature with gentle agitation.
Warning: Perform this step in a fume hood.
4、Wash cells twice in PBS.
4.1 Spin down cells to a pellet (1500 g, 4°C, 5 min) and discard the supernatant.
4.2 Resuspend the pellet in ~10-20 mL PBS and spin down as before, discarding the supernatant after each wash.
4.3 Repeat as necessary.
Notice: When discarding the waste containing formaldehyde, please follow your local regulations for its disposal.
Stage 3 Isolating nuclear fraction
Before we can proceed to fragment DNA, it is best to isolate the nuclei of cells to reduce cytoplasmic proteins.
Materials required
- Nuclear extraction buffer 1 (50 mM HEPES-NaOH pH=7.5, 140 mM NaCl, 1 mM EDTA, 10% Glycerol, 0.5% NP-40, 0.25% TritonX-100, 1× protease inhibitors)
- Nuclear extraction buffer 2 (10 mM Tris-HCl pH=8.0, 200 mM NaCl, 1 mM EDTA, 0.5 mM EGTA, 1× protease inhibitors)
- Centrifuge
Steps
30 minutes approx
1、Incubate cells in nuclear extraction buffer 1.
1.1 Spin cells down to a pellet (1,500 xg, 5 mins, 4°C).
1.2 Resuspend the pellet in ~ 2 mL of extraction buffer 1.
1.3 Incubate in the buffer for 15 min at 4°C with rocking.
Tips: The first extraction buffer is a gentle buffer.
We use 1x10⁷ cells per sample. You might need to optimize the buffer amount for the cell number used in your experiment.
2、Incubate cells in nuclear extraction buffer 2.
2.1 Spin cells down to a pellet (1,500 xg, 5 mins, 4°C).
2.2 Resuspend the pellet in ~ 2 mL of extraction buffer 2.
2.3 Incubate in the buffer for 15 min at 4°C with rocking.
Notice: We use 1x10⁷ cells per sample. You might need to optimize the buffer amount for the cell number used in your experiment.
Stage 4 Sonication
At this stage, we must sonicate the cross-linked nuclear lysate to shear the DNA into fragments. The sonication step will require optimization depending on the cell line used and the protein being targeted. Please note that the following protocol is based on work in HeLa cells.
Histone targets can be sonicated more than non-histone targets as the nucleosomes are protected from fragmentation due to their close association with histone proteins. In contrast, non-histone targets can benefit from larger fragment sizes and less sonication.
Besides sonication, you may want to consider other forms of fragmentation, such as MNase treatment.
Materials required
- Histone sonication buffer (50 mM Tris-HCl pH=8.0, 10 mM EDTA, 1% SDS, protease inhibitors) for histone targets
- Non-Histone sonication buffer (10 mM Tris-HCl pH=8.0, 100 mM NaCl, 1 mM EDTA, 0.5 mM EGTA, 0.1% sodium deoxycholate, 0.5% sodium lauroylsarcosine, protease inhibitors) for non-histone targets
- Sonicator
- Centrifuge
Steps
20 minutes approx
1、Spin down cells to a pellet and resuspend in the histone or non-histone sonication buffer, depending on your target of interest.
1.1 Spin cells down to a pellet at 1,500 g for 5 mins, 4°C, and discard the supernatant.
1.2 Resuspend the pellet in the sonication buffer.
Notice: We use 1 x10⁷ in 350 µL of sonication buffer for HeLa cells.
2、Sonicate lysate to shear DNA to an average fragment size of 150-300 bp for histone targets or 200-700 bp for non-histone targets.
Tips: This step will require optimization depending on the cell line used and the protein of interest.
3、Pellet cell debris using a centrifuge at 17,000 g at 15 mins at 4°C.
3.1 Discard the pellet.
3.2 Keep the supernatant and transfer it into a new tube.
Warning: This supernatant contains the chromatin that will be used for the following stages.
Notice: Note that such high centrifugation speed is needed to completely separate chromatin from the nuclear pellet.
Chromatin can be flash frozen at this point and stored at -80 C for up to 2 months.
Stage 5 Determination of DNA fragment size
Before immunoprecipitating the target protein, we should elute a small test sample. This will allow us to determine the size of the DNA fragments and check they’ve not been degraded.
For histones, we should aim for an average fragment size of 150-300 bp; for non-histones, it’s 200-700 bp.
Materials required
- Direct elution buffer (100 mM NaHCO3, 1% SDS)
- RNAse (10 mg/mL solution) (example R665518)
- Proteinase K (20 mg/mL solution) (example P301575)
- Agarose gel (1-2%)
- DNA molecular weight marker (100 bp)
Steps
12 hours approx
1、Remove a 50 µL aliquot of sonicated sample for testing.
2、Incubate the sonicated sample with the direct elution buffer.
Shake samples in a thermomixer at 65°C for 4.5 h or overnight.
3、Incubate the sample with RNase A solution.
Add 2 µL of RNase A solution and heat at 37°C for 30 min.
Notice: RNase A is included in the buffer as high levels of RNA will interfere with DNA purification when using a PCR purification kit.
4、Incubate the sample with Proteinase K solution.
Add 2 µL of Proteinase K solution and heat at 55°C for 1 h.
Notice: Proteinase K cleaves peptide bonds adjacent to the carboxylic group of aliphatic and aromatic amino acids. Cross-links between proteins and DNA are disrupted, which aids DNA purification.
5、Purify the DNA using your standard laboratory procedures.
Commercial PCR kits or phenol:chloroform extraction.
6、Run the DNA on a 1-2% agarose gel to determine fragment size.
Compare sample bands observed with a marker that has fragments of known length.
Notice: If the fragment size is too low or we have lots of small fragments, the sample has been degraded. In this case, we’ll need to repeat the protocol from the start.
If the fragment size is too large, sonication has not sheared DNA enough. In this case, we’ll need to repeat Stage 4 (Sonication) on your existing sample.
7、Pellet cell debris from sonicated sample prepared in Stage 4, assuming DNA fragment size is validated.
7.1 Spin down cells at 17,000 g for 15 min at 4°C.
7.2 Discard the pellet.
7.3 Keep the supernatant and transfer it into a new tube.
7.4 Store at -20°C until ready for use.
Tips: This supernatant contains the chromatin that will be used for the following stages.
Stage 6 Immunoprecipitation
We’re now ready to perform immunoprecipitation by mixing the sonicated sample with antibody-bound magnetic beads. This will purify DNA fragments associated with the protein of interest.
Materials required
- Histone Target IP buffer (50 mM Tris-HCl pH=8.0, 167 mM NaCl, 1.10% Triton X-100, 0.11% Sodium deoxycholate)
- Non-histone Target IP buffer (10 mM Tris-HCl pH=8.0, 100 mM NaCl, 1 mM EDTA pH=8.0, 0.5 mM EGTA pH=8.0, 0.1% sodium deoxycholate, 0.5% sodium lauroylsarcosine, 1% TritonX, 1× protease inhibitors)
- Protease inhibitor cocktail (example P301906)
- Antibody-coupled magnetic beads (prepared in stage 1)
- RIPA-150 (50 mM Tris-HCl pH=8.0, 150 mM NaCl, 1 mM EDTA, 0.1% SDS, 1% Triton X-100, 0.1% sodium deoxycholate)
- RIPA-500 (50 mM Tris-HCl pH=8.0, 500 mM NaCl, 1 mM EDTA, 0.1% SDS, 1% Triton X-100, 0.1% sodium deoxycholate)
- RIPA-LiCl (50 mM Tris-HCl pH=8.0, 250 mM LiCl, 1 mM EDTA, 1% NP-40, 0.7% sodium deoxycholate)
- TE Buffer (10 mM Tris-HCl pH=8.0, 1 mM EDTA)
- Magnetic rack
- Tube rotator
Steps
12 hours approx
1、Prepare the amount of IP buffer required for your number of samples.
Add protease inhibitors just before use.
Notice: Depending on your target of interest, you’ll need to prepare the IP buffer for histone or non-histone targets.
2、Thaw chromatin samples (if frozen) and dilute them ~ 1/10 in the IP buffer.
Add 100 µL of sample to ~900 µL of IP buffer.
Warning: Keep chromatin samples on ice.
Tips: In this protocol, we calibrate the 100 µL sample to have the equivalent chromatin of 1x10⁷ cells. If you have pooled your samples together, you can split them into separate tubes at this step.
3、Incubate the chromatin samples with antibody-coupled beads overnight at 4°C with gentle rotation.
Tips: At this stage, the antibodies will bind to the chromatin.
4、Wash the beads with a sequence of buffers to remove background.
4.1 Add 1 mL of RIPA-150 buffer and place the tube on a rocker for 2 mins.
4.2 Place the tube on a magnetic rack for ~1 min; the beads should be pulled by the magnet to the bottom of the tube.
4.3 Aspirate and discard the solution, keeping the beads in the tube.
4.4 Repeat RIPA-150 wash steps to wash twice in total.
4.5 Mix the beads with ~1 mL of the RIPA-500 wash buffer for 2 mins on a rocker.
4.6 Place the tube on a magnetic rack for ~1 min; aspirate and discard the solution, keeping the beads in the tube.
4.7 Repeat the RIPA-500 wash steps to wash twice in total.
4.8 Mix the beads with ~1 mL of the RIPA-LiCl wash buffer for 2 mins on a rocker.
4.9 Place the tube on a magnetic rack for ~1 min.
4.10 Aspirate and discard the solution, keeping the beads in the tube.
4.11 Mix the beads with ~1 mL of the TE Buffer for 1 min on a rocker.
4.12 Place the tube on a magnetic rack for ~1 min; aspirate and discard the solution, keeping the beads in the tube.
Tips: The beads are washed with three buffers; the stringency of the wash increases with each change of buffer.
Stage 7 Elution and reversal of cross-links
At this stage, we elute and purify the DNA to prepare it for sequencing.
Materials required
- Elution buffer (100 mM NaHCO3, 1% SDS)
- Magnetic rack
- PCR kit
Steps
7 hours approx
1、Incubate the sonicated sample with the direct elution buffer.
Shake samples in a thermomixer at 65°C for 4.5 h or overnight.
2、Incubate the sample with RNase A solution.
Add 2 µL of RNase A solution and heat at 37°C for 30 min.
Tips: RNase A is included in the buffer as high levels of RNA will interfere with DNA purification when using a PCR purification kit.
3、Incubate the sample with Proteinase K solution.
Add 2 µL of Proteinase K solution and heat at 55°C for 1 h.
Tips: Proteinase K cleaves peptide bonds adjacent to the carboxylic group of aliphatic and aromatic amino acids. Cross-links between proteins and DNA are disrupted, which aids DNA purification.
4、Purify the DNA using your standard laboratory procedures.
Use commercial PCR kits or phenol:chloroform extraction.
5、Proceed to DNA library preparation and sequencing.
It is easier to use a highly sensitive commercial kit to determine the concentration of the immunoprecipitated DNA.
Notice: You may wish to run quantitative PCR before sequencing to check the quality of the DNA fragments.
For more product details, please visit the Aladdin Scientific website.