Sample Preparation Method of Karl Fischer Reagent in the Pharmaceutical Industry

Method of Karl Fischer Sample Preparation in the Pharmaceutical Industry
Medical products can exist in any physical state, such as solid, liquid, or gas. Each form of substance requires a different sample preparation and handling procedure. The process requires precision, accuracy, and system monitoring to meet quality and safe ty expectations. Add material at a constant rate to ensure consistency.
Each ingredient and how much it is used plays a vital role in the production process. Moisture content affects many physical properties, including weight, density, shelf life, and stability, and each ingredient may contain moisture. Water content ensures proper crystallization and chemical formation as well as the production of solid tablets. Solid and dense pharmaceutical products may contain ingredients that are irritating to the skin or harmful for inhalation, making these physical properties extremely important for safety.
Monitoring moisture content throughout the manufacturing process is essential, so it is important to know the appropriate methods for the job. The Carl Fisher method is a titration method that is one of the most commonly used analytical methods in water content measurement.
Sample Properties
The method by which Karl Fischer titration works depends largely on the properties of the sample. The concerns for dealing with gaseous, solid samples, low viscosity, and high viscosity liquids are:
1,Sample input
2,Solubility
3,Number of samples
4,Sample size
5,Water yield
Liquid Samples Handling
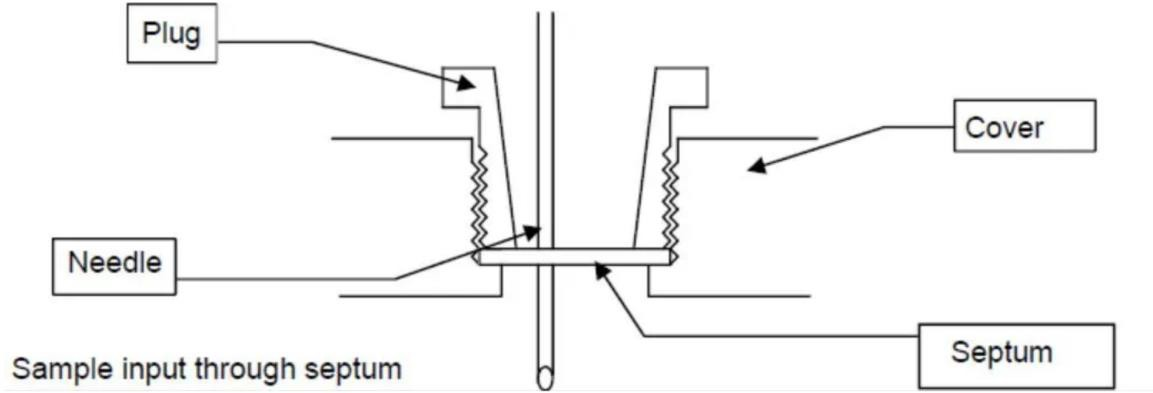
Typically, liquid samples are injected through a diaphragm using a one-way syringe. The size of the syringe depends on the sample volume, with specific options ranging from 1 mL to 20 mL.
The needle diameter of these syringes ranges from 0.6 to 1.2 mm. Slenderer needles are only suitable for low-viscosity samples, while thicker needles should be used for samples with higher viscosity. The thicker the needle, the greater the degree of impact it will have on the diaphragm, resulting in earlier replacement of the diaphragm. The needle should be between 50 and 90 mm in length, which will ensure that no droplets stick to the wall. Dipping the needle into the solvent should be avoided.
Particularly high viscosity samples, such as oil, can be transferred into titration cups without a needle and diaphragm.
The diaphragm is made of polymer, should be sized to fit the device, and can be tight ly aligned directly after being punctured. These silicone discs should also be replaced regularly, with frequency depending on the number of uses.
Working procedure
According to good laboratory practice, samples must be weighed using an analytic a l balance. The working procedure for liquid sample preparation is as follows:
1,Place a 150 mL glass beaker on a scale
2,Inhale the liquid sample into the syringe
3,Put the needle protector back on
4,Place the syringe with the needle facing up into the beaker
5,Weigh the scales to remove the skin
6,Carefully remove the syringe from the scale, then remove the needle protector
7,Inject the sample into the titration cup through the diaphragm
8,Remove the syringe from the diaphragm and put the needle protector back on
9,Place the syringe with the needle facing up into the beaker on the scale
10,Read the negative weight on the balance, then enter the absolute value on the titrator
11,When drawing the sample into the syringe, proceed carefully and slowly to avoid unnecessary drawing of air into the sample, which may introduce moisture from the air into the sample.

Solid Samples Handling
There are two common methods for handling solid samples - direct sample entry and using a solid lock.
Direct Sample Input
Direct sampling is the easiest way to add a solid sample to a Karl Fischer titration tank. The humidity of the ambient air during battery opening may cause blank values. Determine the blank value in a separate titration and subtract the difference. The smaller the amount of water to be measured, the less appropriate this method of adding samples will be. As a rule of thumb, the blank value should not be greater than the amount of water to be measured.
Use a glass or aluminum weight boat to weigh the sample for easy transport to the titration tank. After weighing the samples, make sure you no longer touch them with your hands.
Use of Solid Locks
With solid locks, re-conditioning can be done after the titration container is opened and before the sample is introduced into the solvent. Sample quantities are limited to a small sample size in one gram range.
Working Procedure
Work procedures are based on the following schemes:
1,The sample is weighed inside a solid lock
2,Pull the outside of the solid lock to the inside of the containing sample until the part containing the sample is completely closed
3,Open the titration container, then place the outside of the solid lock with the built - in NS 19 grinding surface in the opening
4,Start conditioning
5,Push down on the inside to dissolve the sample
6,Start the titration with a longer extraction time to dissolve the sample. Alternative l y, you can specify a minimum titration duration
Using a strong lock may involve higher drift. This can be considered accordingly in the titration method
Use an Oven to Dry Sample
In many cases, direct determination is not possible because:
1,Sample is insoluble (plastic)
2,The sample releases water when heated
3,The sample enters a side reaction
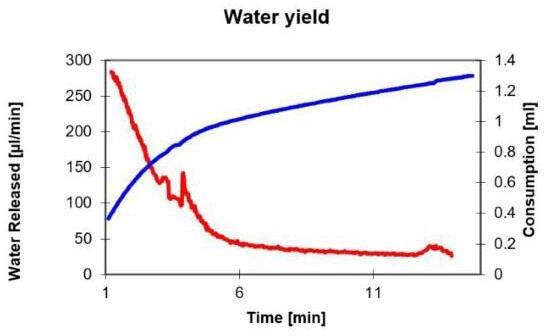
At this point, we can heat the sample in the oven, and the water vapor is transferred through the drying gas to the titration container. In this process, most of the water is released at the beginning. The figure below shows how the water contained in the sample is released. At the end of the titration, the amount added is limited by the drift value. In the figure, side reactions are represented by high residual drift. The X-axis shows duration of titration, the first Y-axis shows drift, and the second Y-axis shows consumption.

After about five minutes, most of the water is released. We recommend a heating time of 10 minutes. This time is set to the titrator's wait time. Subsequently, the amount of water absorbed in the solvent is titrated over a short period of time. If the front drift is not reached again, or is barely reached again, this indicates a side reaction.
With the titration in the graph, it was proven that thermal decomposition leads to the generation of formaldehyde, which reacts with the methanol in the titration cell to form acetal, with water being separated.
Aladdin:https://www.aladdinsci.com
List of related products
